
Most Hostinger plans can’t run a Node.js app. That surprises a lot of people, usually right after they’ve paid.
Here’s how to host a Node.js app on Hostinger, and which plans let you do it with a few clicks in hPanel. In hPanel, Node.js apps show up as “Web Apps,” so you’ll see both names.

Which Hostinger plans support Node.js?
Here’s the short version:
| Plan | Node.js through hPanel Web Apps | What to know |
|---|---|---|
| Business Web Hosting | Yes | The lowest shared plan that supports it |
| Cloud Startup, Professional, Enterprise, Enterprise Plus | Yes | More resources for bigger or busier apps |
| VPS and dedicated | Runs Node.js, but you set it up by hand | You install and configure everything from the command line |
| Shared plans below Business | No | Static sites work fine (a React build, for example) |
Each plan that supports Web Apps includes a set number of them. If you hit the limit, you remove an app you don’t use or move up a plan. Check the plan page for the current number before you buy.
Which one should you pick? For one or two small apps, Business Web Hosting is the place to start. Pick a Cloud plan if the app needs more CPU and memory, or you want room for more apps. Go with a VPS if you need full control: your own ports, background workers, or a setup the panel doesn’t cover.
Hostinger’s prices and plan names change, so look at the current plan page. See current Hostinger plans
Running a plain React app instead? That works on cheaper plans too. See How to deploy a React app on Hostinger
What you need before you start
- A Hostinger plan from the table above
- A Node.js project with a
package.jsonfile - Node.js 18, 20, 22, or 24 (22 is the default, and 20 and 22 are LTS versions)
- Your code on GitHub, on gitlab.com, or zipped up on your computer
If your app is a backend (Express, NestJS, Fastify, or Hono), you also need an entry file. That’s the script Node runs to start your server, for example server.js. It has to end in .js, .mjs, or .cjs.
Frontend frameworks like React, Vue, and Vite don’t need one. Next.js doesn’t either, because Hostinger starts its server for you.
Hostinger detects most popular frameworks on its own, including React, Vue, Angular, Next.js, Nuxt, Astro, SvelteKit, Express, and NestJS. Anything else deploys as “Other,” and you fill in the build settings yourself.
Method 1: host a Node.js app on Hostinger from GitHub
This is the route I’d pick. Every push to your branch rebuilds the app, so updates take one git push. The steps follow Hostinger’s own Node.js docs.
Step 1: push your code to GitHub
Leave node_modules out of the repo. A .gitignore file takes care of that.
Step 2: add a new Node.js web app
In hPanel, open Websites, click Add Website, and pick Node.js web app.
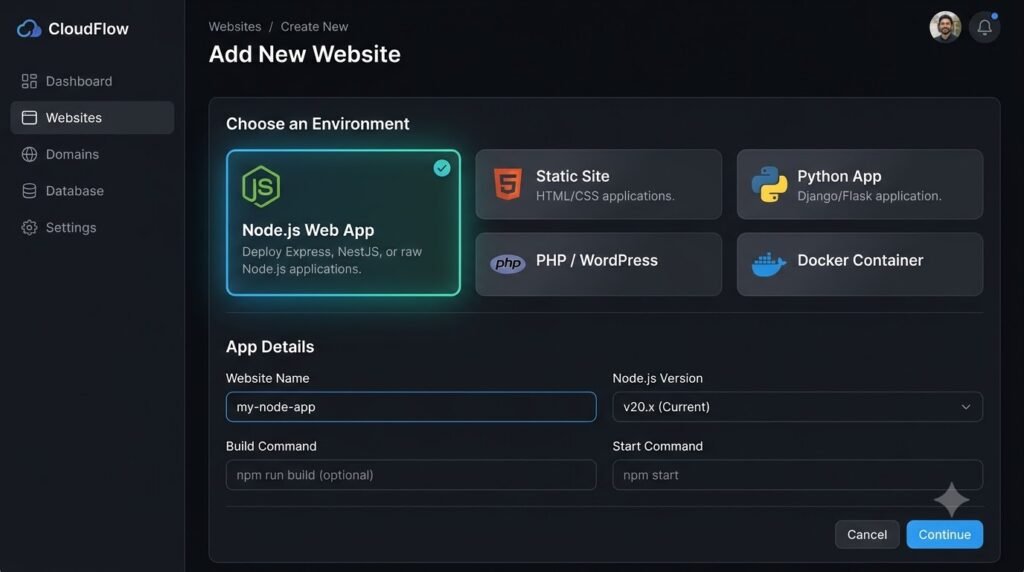
Step 3: connect GitHub
Click Connect with GitHub. A popup asks you to install the Hostinger GitHub app and choose which repositories it can see. Pick your repo and click Deploy.
You can use gitlab.com the same way. Self-managed GitLab servers aren’t supported.
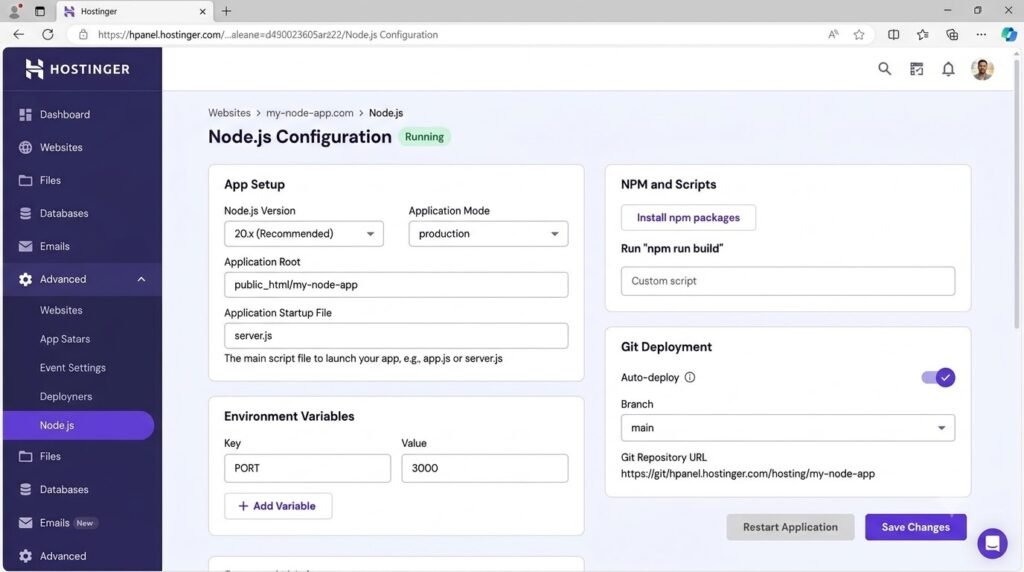
Step 4: check the deploy settings
Hostinger fills these in for you. Read them before you confirm:
- Framework preset: your framework, or “Other”
- Branch: the branch that triggers a build, usually
main - Node.js version: 22 is the default
- Build command: an npm script from your
package.json, such asnpm run build - Package manager: npm, yarn, or pnpm, picked from your lockfile
- Output directory: where the build lands (
dist,build,out, or.next), needed for frontend apps - Entry file: for server apps, the file that starts your app
- Environment variables: anything your app reads from
process.env
Add your environment variables now, before the first build. Not sure what goes in a field? Open your package.json and look at the scripts block.
Step 5: deploy and watch the build
Click Deploy. Hostinger installs your dependencies, runs the build, and starts the app. The build log streams live, so you can see where it stops if something breaks.
When it finishes, your app is live on your domain.
Method 2: upload a zip file
No Git repo? Zip the project and leave out node_modules and .git:
bash
zip -r myapp.zip . --exclude "node_modules/*" --exclude ".git/*"Then follow the same flow: Websites, Add Website, Node.js web app, and choose Upload your files. Hostinger takes .zip, .tar, .tar.gz, and .tgz files, one project at a time. Confirm the deploy settings and click Deploy.
One catch. If the domain is already added to your plan as a regular website, remove that website first. The Node.js flow wants to create a fresh slot for the domain.
Method 3: start from a template
If you have no code yet, Hostinger has ready-made starters built with Astro, Vite, React, Next.js, Nuxt, and SvelteKit. Pick Start from a template in the same flow, hit Use template, and Hostinger copies it into a new repo on your account and deploys it.
Each template counts as one Web App toward your plan’s limit.
A small Express app to test with
Want to check your setup before you push real code? This is about the smallest server there is.
server.js:
js
const express = require("express");
const app = express();
const port = process.env.PORT || 3000;
app.get("/", (req, res) => {
  res.send("Hello from Hostinger");
});
app.listen(port);package.json:
json
{
  "name": "hello-hostinger",
  "version": "1.0.0",
  "main": "server.js",
  "scripts": {
    "start": "node server.js"
  },
  "dependencies": {
    "express": "^4.19.2"
  }
}
Set the entry file to server.js. If the form asks for a build command and you don’t have one, add a build script that does nothing, or check Hostinger’s docs for how to leave it empty.
What happens after you deploy
Logs. You get two kinds. Build logs show what happened during the deploy, and past builds sit under Deployments. Runtime logs show whatever your running app prints. If a build fails, Hostinger also writes an automatic analysis of the failure.
Restarts. If your app crashes, Hostinger restarts it automatically. For server apps you can also click the Running badge in the dashboard and choose Restart.
On-demand processes. Node.js apps on Hostinger run on demand. After a stretch with no traffic, the process stops to free up server resources. The next request starts it again. In practice, the first visit after a quiet period can feel a little slower.
Databases. The dashboard has a Connect a database wizard for Supabase and MongoDB Atlas. It sets the environment variables for you and redeploys the app. For any other database, add the connection details as environment variables yourself.
Security scans. Hostinger scans the npm packages your app installs after every deployment. For apps connected to GitHub, it can open a pull request to fix flagged packages.
Resource usage. The dashboard shows live CPU, memory, and I/O against your plan’s limits. If a line sits near the limit, it’s time to tune the app or move up a plan.
Fix the common problems
Build failed. Open the failed deployment and read the log. The usual causes are a wrong build command, a wrong output directory, or a Node.js version your dependencies don’t support.
“Missing package.json” error. The Node.js flow needs a package.json at the root of the app. Add one. If your repo is just static files, use the Deploy as static option instead.
Green build, but the app doesn’t respond. The build worked and the process crashed on startup. Check the runtime logs. The common causes are missing environment variables and a hard coded port, so avoid fixing the port in your code.
403 error after a redeploy. The .htaccess file in public_html is stale or was edited by hand. Hostinger regenerates it on every deploy, so redeploy and don’t edit it.
“You’ve reached your app limit.” Remove an app you don’t use, or upgrade the plan.
What about Node.js on a VPS?
A VPS runs Node.js too, but without the panel flow above. You connect over SSH, install Node.js, set up a process manager, and handle the web server yourself. It takes more work and gives you more control. See Hostinger shared hosting vs VPS: which one fits your site? if you’re deciding.
FAQs
Does Hostinger support Node.js? Yes. You can host a Node.js app on Hostinger through hPanel on Business Web Hosting and the Cloud plans, or set it up manually on a VPS.
Can I run Node.js on Hostinger’s cheapest plan? Not through the hPanel Web Apps flow. The shared plans below Business don’t include it. A static site, like a React build, works fine on them.
Which Node.js versions does Hostinger support? Versions 18, 20, 22, and 24. Version 22 is the default, and Hostinger recommends an LTS version (20 or 22) for production.
Can I deploy Next.js on Hostinger? Yes. Next.js runs in server mode, and Hostinger starts its server for you.
Will my app stay online all the time? It runs on demand. The process stops after a period without traffic and starts again on the next request.
Can I use my own domain? Yes. Attach your domain to the app in hPanel. See How to connect a domain bought elsewhere to Hostinger.
Which plan should you pick?
If you want to host a Node.js app on Hostinger without fuss, start with Business Web Hosting and deploy from GitHub. Move to a Cloud plan when the dashboard shows the app running near its limits, and to a VPS when you need control the panel can’t give you.
Ready to host your Node.js app on Hostinger? Get started with Hostinger
Related reading: how to connect a domain bought elsewhere to Hostinger

Naresh runs ToolCheckHQ and builds affiliate sites and YouTube channels around marketing software. He reviews tools by digging through pricing pages, plan limits, help docs and user complaints, then explains in plain English what a tool really costs and who it suits.


Pingback: Can Hostinger host Node.js? Yes, on these plans (2026)