
You bought your domain at GoDaddy, Namecheap, or somewhere else. Your hosting is at Hostinger. Right now the two don’t know about each other, so your domain shows a parking page instead of your site.
Here’s how to connect a domain bought elsewhere to Hostinger. It takes about 5 minutes of clicking, plus some waiting.
You don’t have to transfer the domain. It stays registered where you bought it, and you change one setting there.

Nameservers explained in plain language
When someone types your domain into a browser, the internet has to find out which server holds your site. Your nameservers answer that question. They’re the listing that says “for this domain, ask here.”
Your registrar sets them to its own defaults when you buy a domain. That’s why your domain shows a parking page: it’s asking the registrar’s servers, and nothing is hosted there.
To connect your domain to Hostinger, you tell the registrar to send questions to Hostinger’s nameservers instead. Hostinger then points visitors to your hosting plan.
An A record does the same job a different way. It’s one DNS entry that maps your domain straight to your hosting server’s IP address.
Nameservers or A record: which one should you use?
| Nameservers | A record | |
|---|---|---|
| What you change at the registrar | Both nameservers | One DNS record |
| Where you manage DNS afterward | Hostinger’s hPanel | Your registrar |
| Hostinger’s recommendation | Yes | Backup option |
| Good for | Most people | Registrars that won’t let you change nameservers, or setups that keep DNS elsewhere |
Hostinger recommends nameservers, and so do I. Everything lives in one place, and hPanel handles your DNS records for you. Use the A record route only when your registrar blocks nameserver changes or you need DNS to stay where it is.
Before you start
1. Add the domain to your Hostinger plan. In hPanel, add the domain when you create or set up your website. Hostinger has to know the domain belongs on your plan before you point it anywhere.
2. Copy your old DNS records. Changing nameservers replaces the DNS records at your old host, including email records. Open your current DNS settings and write down or screenshot anything you want to keep, especially MX records (email) and TXT records (email security and service verification).
3. Check that your site is ready. If your domain currently shows a live site somewhere else, don’t switch until the new one works. See How to migrate your website to Hostinger for free.
4. Turn off DNSSEC if your registrar has it on. If it stays on while you change nameservers, your domain can stop resolving. You can turn it back on once the move is done.
Don’t have hosting yet? See current Hostinger plans
Method 1: connect your domain with Hostinger nameservers
These steps follow Hostinger’s nameserver guide.
Step 1: find your Hostinger nameservers
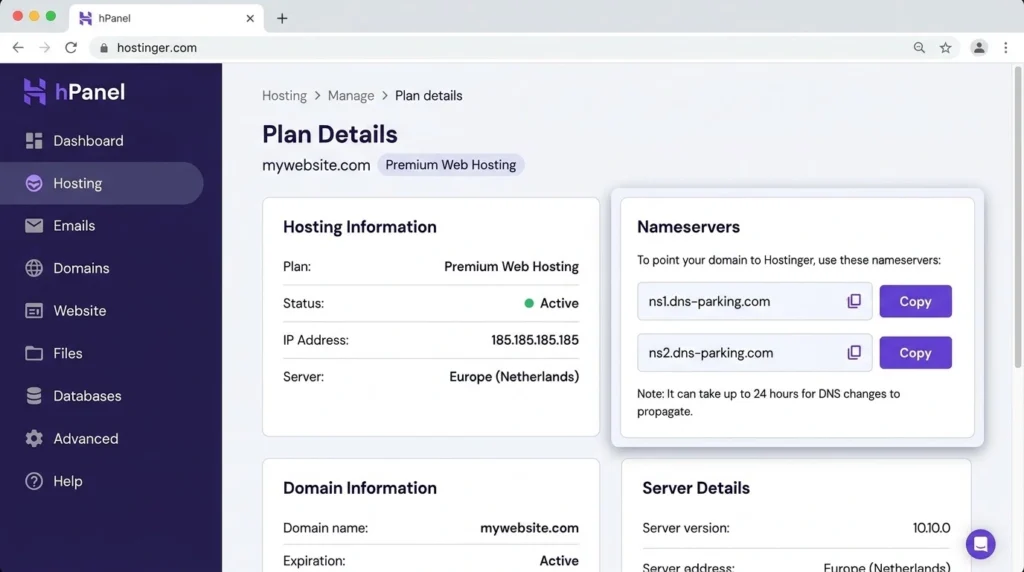
In hPanel, open Websites, click Manage on your site, and look under Plan Details. For Web, WordPress, and Cloud hosting plans, the nameservers are:
ns1.dns-parking.com
ns2.dns-parking.com
Some registrars ask for IP addresses next to the names. Hostinger lists these:
ns1.dns-parking.com (162.159.24.201)
ns2.dns-parking.com (162.159.25.42)
Copy the values hPanel shows for your own plan. If they differ from the ones above, use hPanel’s.
Step 2: open your registrar’s nameserver settings
Log in to the account where you bought the domain. Look for Nameservers, DNS, or Domain settings. You can only change nameservers at the registrar that holds the domain.
Registrar menus change, so here’s roughly where to look:
-
- GoDaddy: open your domain, go to DNS, then Nameservers, click Change Nameservers, and choose I’ll use my own nameservers.
-
- Namecheap: go to Domain List, click Manage on your domain, find Nameservers, and switch the dropdown from Namecheap BasicDNS to Custom DNS.
-
- Other registrars: look for “custom nameservers” or “use external nameservers.”
Step 3: replace the old nameservers
Delete the existing nameservers and paste in Hostinger’s two. Save. Some registrars, GoDaddy among them, ask you to confirm that you understand the change. Tick the box and continue.
Step 4: wait for the change to spread
DNS changes aren’t instant. It can take anywhere from a few minutes to 24 hours, and occasionally up to 48. Your registrar saves the change right away, but servers around the world update on their own schedule.
During this window, some visitors see the old setup and others see the new one. That’s normal.
Method 2: connect your domain with an A record
Use this when your registrar won’t let you change nameservers.
Step 1: find your Hostinger IP address
Find the IP address of your hosting plan in hPanel. Check your plan details, and ask Hostinger support if you can’t find it.
Step 2: edit the DNS records at your registrar
Open the DNS settings for your domain. Find the existing A record for @ (the root of your domain) and change its value to your Hostinger IP address. If there’s no A record, add one.
Then check the www version. It should either be a CNAME record that points to your domain, or an A record with the same IP.
Remove any other A records for @ that point somewhere else. Conflicting records cause a flaky site that works for some visitors and not for others.
Step 3: save and wait
Same waiting game as before. An A record change usually spreads faster than a nameserver change, but plan for the same range.
Using Cloudflare for your DNS? Add the A record in Cloudflare.

How to check that it worked
Open your domain in a browser. If you still see the old site or a parking page, try a private window first, or flush your computer’s DNS cache.
For a more reliable check, use a DNS lookup tool such as whatsmydns.net, which shows what servers around the world return. When most locations show Hostinger’s nameservers or IP, you’re set.
Once the domain resolves, go back to hPanel and turn on the free SSL certificate so your site loads over https.
Don’t break your email
Changing nameservers replaces your old DNS records. If your email runs at your old host or on a service like Google Workspace, it can stop working the moment the change spreads.
Before you switch, decide where email will live:
-
- On Hostinger Email: create your mailboxes first, and Hostinger sets the email records for you.
-
- On an outside service: after the switch, add the MX and SPF records from your notes into hPanel’s DNS zone.
Fix the common problems
“This site can’t be reached.” The nameservers didn’t save, or a letter is wrong. Open your registrar’s settings and compare them with hPanel, character by character. Then wait. See How to fix “this site can’t be reached” after connecting a domain to Hostinger.
You still see the old site or a parking page. It’s probably DNS spreading or your browser cache. Try a private window, then another device on mobile data. See How long does DNS propagation take after connecting a domain to Hostinger?
The domain works, but www doesn’t. There’s no record for www. Add a CNAME for www that points to your domain.
“Not secure” warning or an SSL error. SSL can’t be issued until the domain points to Hostinger. Wait until the domain resolves, then turn SSL on in hPanel.
Email stopped working. You lost your MX records in the switch. Add them back from your notes.
hPanel won’t accept the domain. Check whether it’s already added to another website or plan in your account.
Your domain stopped resolving entirely. DNSSEC may be on at the registrar. Turn it off and check again.
FAQs
What are Hostinger’s nameservers? For Web, WordPress, and Cloud hosting plans they’re ns1.dns-parking.com and ns2.dns-parking.com. Always copy the values from your own hPanel in case yours differ.
Do I need to transfer my domain to Hostinger? No. Pointing keeps the domain registered at your current registrar. A transfer is optional, and some people do it later to manage everything in one place.
Should I use nameservers or an A record? Nameservers for most people. Choose an A record when your registrar blocks nameserver changes or you want DNS to stay at your registrar.
How long does it take for a domain to connect to Hostinger? Anywhere from a few minutes to 24 hours. Some changes take up to 48.
Will my website go down while I switch? If your old site is still live, visitors keep seeing it until the change spreads. Switch only after the new site is ready.
Will my email break? It can, because changing nameservers replaces your DNS records. Plan your email setup before you switch.
Can I use my domain on Hostinger and keep it at GoDaddy or Namecheap? Yes. That’s exactly what this guide sets up.
Which method should you pick?
Use nameservers unless your registrar stops you. Copy your old DNS records first, switch when the new site works, and give the change a day to spread.
Ready to connect your domain to Hostinger? Get started with Hostinger
Related reading: how to move a website from localhost to Hostinger

Naresh runs ToolCheckHQ and builds affiliate sites and YouTube channels around marketing software. He reviews tools by digging through pricing pages, plan limits, help docs and user complaints, then explains in plain English what a tool really costs and who it suits.

