
Your site works on localhost. Now you want it online, and nothing about the move is obvious: files go one place, the database goes another, and the config file still points at your own computer.
Here’s how to move a website from localhost to Hostinger. Hostinger’s free migration service copies sites from another live host, so a site on your own machine is yours to move. It takes about 30 minutes for a small site.

What you need before you start
- A Hostinger hosting plan. See current Hostinger plans
- Your local site, running in XAMPP, WAMP, MAMP, Local, or similar
- Access to your local phpMyAdmin (every one of those tools has it)
- A domain attached to your Hostinger plan
Know what kind of site you have. A WordPress site has wp-content and wp-config.php in its folder, plus a MySQL database. A plain HTML site is only files. A PHP app usually has files and a database.
Which method should you use to move a website from localhost to Hostinger?
- Plugin (WordPress only). Fastest. A migration plugin packs your files and database into one file, and you import it on Hostinger. The free version of these plugins caps the size of what you can import, so big sites hit a wall.
- Manual (any site). Takes longer. You move the files and database yourself. It works for every site type and every size, and you see exactly what’s going where.
Small WordPress site? Use the plugin. Anything else, or a large site, go manual.
Method 1: move a website from localhost to Hostinger with a plugin
This uses the All-in-One WP Migration plugin. Duplicator works too, with slightly different steps.
Step 1: export your local site
In your local WordPress dashboard, install and activate All-in-One WP Migration. Go to All-in-One WP Migration, then Export, click Export To, and choose File. Download the .wpress file when it finishes.
Step 2: install a fresh WordPress on Hostinger
Log in to hPanel and install WordPress on your domain. Then log in to that new WordPress dashboard.
Step 3: import the file
On the Hostinger site, install and activate the same plugin. Go to All-in-One WP Migration, then Import, and drop in your .wpress file. If the plugin says the file is too big, switch to the manual method below.
Step 4: log in again and save permalinks
The import replaces everything on the new site, including your user account. After it finishes, you’ll be logged out. Log in with the username and password from your local site.
Then go to Settings, then Permalinks, and click Save Changes without changing anything. This fixes 404 errors on posts and pages.
Method 2: move a WordPress site from localhost to Hostinger by hand
This is the method that works for any size. It follows the same steps as Hostinger’s own WordPress migration guide, adapted for a site that starts on your computer.
Step 1: export your local database
Open your local phpMyAdmin and select your WordPress database in the left column. Click the Export tab, leave the method on Quick and the format on SQL, and click Export. You get a .sql file.
For a big database, choose Custom and turn on compression. The file gets much smaller, and Hostinger’s phpMyAdmin accepts compressed files.
Step 2: zip your site files
Open your local site folder (in XAMPP it’s usually htdocs/yoursite). Select everything inside, including wp-content, wp-config.php, and the other WordPress files, and zip it. Zip the contents, not the folder that holds them.
Step 3: create a database on Hostinger
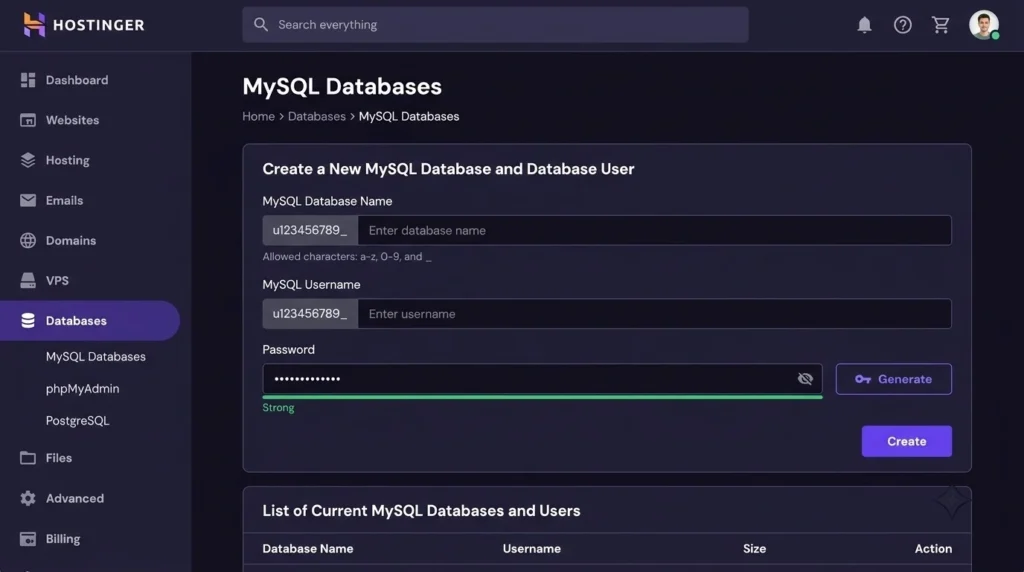
In hPanel, open Databases, then Management. Fill in a database name, a username, and a password, and click Create. Write all three down. You need them in a few minutes.
Step 4: upload your files
In hPanel, open File Manager and go to public_html. Delete the placeholder page Hostinger puts there. Upload your zip, then extract it.
Check that wp-config.php and wp-content sit directly in public_html. If they’re inside a subfolder, your site won’t load at your domain.
Step 5: import the database
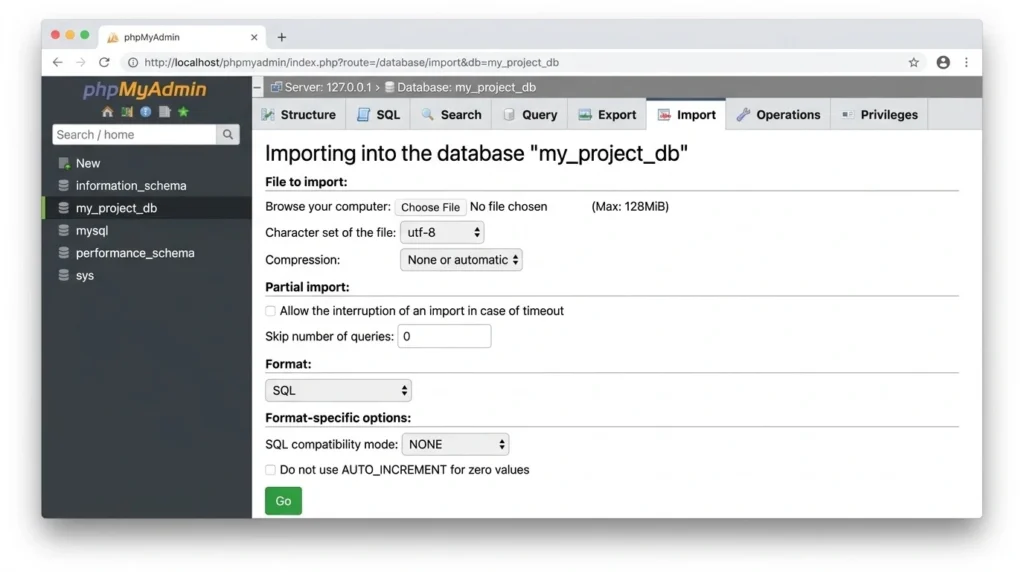
Back in Databases, click Enter phpMyAdmin next to the database you created. Open the Import tab, choose your .sql file, and click Import.
If your database is bigger than 256 MB, the phpMyAdmin upload won’t take it. Hostinger documents an SSH method for large imports.
Step 6: update wp-config.php
Open wp-config.php in File Manager and replace the local database details with the ones you wrote down:
php
define( 'DB_NAME', 'your_new_database_name' );
define( 'DB_USER', 'your_new_username' );
define( 'DB_PASSWORD', 'your_new_password' );
define( 'DB_HOST', 'localhost' );
DB_HOST stays localhost here. On Hostinger, “localhost” means the database server next to your files, so that line is right.
Also check $table_prefix in the same file. Open your database in phpMyAdmin and look at the table names. If they start with wp_, the prefix should be wp_. If they start with something else, put that in the file.
Step 7: replace the localhost URLs
This is the step most guides skip, and it’s why people see a broken site after a good import. Your database still says your site lives at something like http://localhost/mysite.
First, open the wp_options table in phpMyAdmin. Edit the siteurl and home rows and set both to your real address, for example https://yourdomain.com.
Then run a search and replace across the whole database to swap the old address for the new one. A plugin like Better Search Replace does it from your dashboard. Don’t edit the .sql file in a text editor. WordPress stores some settings in a format that records text length, and a plain find and replace breaks it.
Step 8: turn on SSL and test
In hPanel, turn on the free SSL certificate for your domain. Then open your site, click through a few pages, and check that images load. Log in to the dashboard and save your permalinks once.
Moving a plain HTML or PHP site
Static HTML site. Upload your files to public_html. Your index.html has to sit directly in that folder. That’s the whole job.
PHP site with a database. Follow Method 2, steps 3 to 6. The config file has a different name (often config.php or .env), but the idea is the same: new database name, user, and password.
Three things break plain sites after a move:
- Hard coded localhost addresses. Search your code for
localhostand127.0.0.1and change them. - Capital letters in file names. Your Windows or Mac machine treats
Logo.pngandlogo.pngas the same file. Hostinger’s servers don’t, so<img src="logo.png">fails if the file is calledLogo.png. Make the names match exactly. - PHP version. Pick the version your code expects in hPanel.
Moving a Node.js app? That’s a different setup. See How to host a Node.js app on Hostinger
A React build is simpler, See How to deploy a React app on Hostinger
Fix the common problems
“Error establishing a database connection.” The credentials in wp-config.php don’t match the database you created. Check the name, user, and password character by character. Also make sure the database user has all privileges on that database.
The site loads but links or images point to localhost. The URL replacement in step 7 didn’t finish. Check siteurl and home, then rerun the search and replace.
Posts and pages show a 404. Go to Settings, then Permalinks, and save.
White screen. A plugin or theme is failing on the new server. In File Manager, rename the plugins folder inside wp-content to plugins-off. If the site loads, rename it back and rename plugins one at a time until you find the culprit.
Import says the file is too large. Use the compressed export from step 1, or import over SSH. For plugin imports, switch to the manual method.
Images missing after the move. Check that the uploads folder came across inside wp-content, and check for file name capitalization.
Padlock missing or mixed content warnings. Make sure SSL is on, and run the search and replace again so your database uses https://.
FAQs
Can I move a localhost website to Hostinger for free? The migration itself costs nothing. You do it yourself with a free plugin or by hand. You do need a Hostinger plan to host the site.
Does Hostinger’s free migration service work for localhost? That service copies sites from another live host. A site on your own computer has no login for them to use, so you move it yourself with the steps above.
Will my live site go down during the move? No. The site isn’t live yet, so there’s nothing to take offline.
What if my database is bigger than 256 MB? Import it over SSH instead of phpMyAdmin. Hostinger has a support article on it.
Do I need to change my domain’s DNS? If your domain already points to your Hostinger plan, no. If you bought it elsewhere, see [INTERNAL LINK: How to connect a domain bought elsewhere to Hostinger].
Which method should you pick?
For a small WordPress site, the plugin gets you online in minutes. For anything big, or anything that isn’t WordPress, the manual route takes longer and always works.
Ready to move a website from localhost to Hostinger? Get started with Hostinger
Related reading: how to connect a domain bought elsewhere to Hostinger

Naresh runs ToolCheckHQ and builds affiliate sites and YouTube channels around marketing software. He reviews tools by digging through pricing pages, plan limits, help docs and user complaints, then explains in plain English what a tool really costs and who it suits.

